
Texas Instruments has their own Linux kernel repo with branches to support their processors such as the Sitara AM3358 in the BeagleBone Black:
This repo contains a Linux kernel that has been integrated with outstanding TI open source patches based on the open source Linux kernel found at kernel.org
Here is a good presentation for TI TechDay 2015 on how TI handles Linux engineering.
The most excellent Robert C. Nelson has made it very easy to run TI kernels on your BeagleBone Black by using his ti-linux-kernel-dev repo. The newest branch is ti-linux-4.1.y. While current kernel.org stable is 4.3, TI is working on 4.1 as it is current Long Term Support (LTS) kernel. Linux 4.4 is expected to be released at the end of the year, and that will become the new LTS kernel. I believe TI will then move forward to that.
A big advantage of moving to Linux 4.1 is that the fbtft drivers are now in the Linux kernel: drivers/staging/fbtft. Last December, Thomas Petazzoni of Free Electrons took it upon himself to add notro’s fbtft drivers to the kernel: [PATCH 00/29] staging: add drivers from the fbtft project. Development in notro’s repo has ceased and moved to the Linux kernel drivers staging tree. fbtft is maintained by Noralf Trønnes (notro) & Thomas Petazzoni.
Here are the steps that I followed. Full transcript is in my GitHub Gist.
Step 1: Build kernel
These commands were on my 64-bit Intel laptop running Debian GNU/Linux 8.2:
laptop$ git clone https://github.com/RobertCNelson/ti-linux-kernel-dev/
Cloning into ‘ti-linux-kernel-dev’…
remote: Counting objects: 6549, done.
remote: Compressing objects: 100% (56/56), done.
remote: Total 6549 (delta 37), reused 0 (delta 0), pack-reused 6493
Receiving objects: 100% (6549/6549), 5.21 MiB | 3.17 MiB/s, done.
Resolving deltas: 100% (5036/5036), done.
Checking connectivity… done.
laptop$ cd ti-linux-kernel-dev
laptop$ git checkout ti-linux-4.1.y
Branch ti-linux-4.1.y set up to track remote branch ti-linux-4.1.y from origin by rebasing.
Switched to a new branch ‘ti-linux-4.1.y’
laptop$ ./build_kernel.sh
After running for awhile, build_kernel.sh will invoke the kernel config menu. Enable the fbtft modules located in the Device Drivers -> Staging menu. Here are photos of kernel config menus:


Step 2: Flash SD card
Flash a Debian 8.2 (Jessie) Snapshot console image from the BeagleBoneBlack Debian page on the eLinux.org wiki:
laptop$ sudo dd if=bone-debian-8.2-console-armhf-2015-10-11-2gb.img of=/dev/sdc
3481600+0 records in
3481600+0 records out
1782579200 bytes (1.8 GB) copied, 686.836 s, 2.6 MB/s
laptop$ sudo eject /dev/sdc
Step 3: Install new kernel
Re-insert SD card so that its filesystem is mounted. Run the kernel install script from yourti-linux-kernel-dev directory:
laptop$ sudo ./tools/install_kernel.sh
Unmount and eject the SD card:
laptop$ sudo umount /dev/sdc1
laptop$ sudo eject /dev/sdc
Insert SD card into BeagleBone Black and boot it.
The install script fails to do the following so it must be done manually. Copy the kernel image and device tree bindings to the expected location:
bone$ sudo cp /zImage /boot/vmlinuz-4.1.13-ti-r30
bone$ sudo cp -pr /dtbs /boot/dtbs/4.1.13-ti-r30
Edit /boot/uEnv.txt to set uname_r=4.1.13-ti-r30 and set dtb=am335x-boneblack-overlay.dtb:
bone$ sudo vi /boot/uEnv.txt
uname_r=4.1.13-ti-r30
dtb=am335x-boneblack-overlay.dtb
Run script to grow filesystem to make use of the SD cards full capacity:
bone$ cd /opt/scripts/tools
bone$ sudo ./grow_partition.sh
Reboot the BeagleBone:
bone$ sudo reboot
After rebooting, verify that the new kernel is running:
bone$ uname -a
Linux beaglebone 4.1.13-ti-r30 #1 SMP PREEMPT Mon Nov 16 00:50:22 CST 2015 armv7l GNU/Linux
Step 4: Enable SPI
Now build & install the latest Device Tree Overlays from bb.org-overlays repo:
bone$ git clone https://github.com/beagleboard/bb.org-overlays
bone$ cd bb.org-overlays/
bone$ ./dtc-overlay.sh
bone$ ./install.sh
Enable the spi1 peripheral (which LCD is wired up to) by loading the BB-SPIDEV1 Device Tree overlay:
bone$ cat /sys/devices/platform/bone_capemgr/slots
0: PF—- -1
1: PF—- -1
2: PF—- -1
3: PF—- -1
bone$ sudo /bin/sh -c ‘echo BB-SPIDEV1 > /sys/devices/platform/bone_capemgr/slots’
bone$ cat /sys/devices/platform/bone_capemgr/slots
0: PF—- -1
1: PF—- -1
2: PF—- -1
3: PF—- -1
4: P-O-L- 0 Override Board Name,00A0,Override Manuf,BB-SPIDEV1
Step 5: Load fbtft driver
Load the fbtft_device kernel module for adafruit18 (Adafruit 1.8″ TFT LCD) which will then load the fb_st7735r driver:
bone$ sudo modprobe fbtft_device busnum=1 name=adafruit18 debug=7 verbose=3 gpios=dc:48,reset:60
Install fbi to display image on the LCD:
bone$ sudo apt-get update
bone$ sudo apt-get install fbi
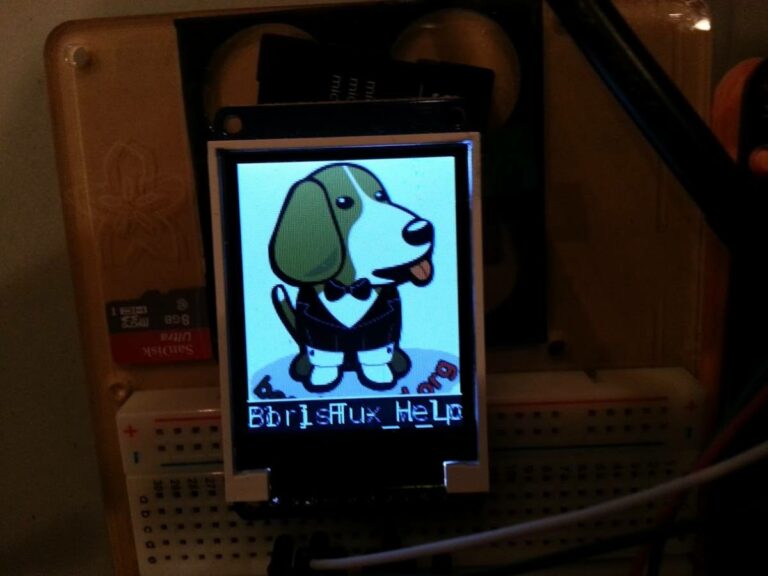
bone$ wget ‘http://beagleboard.org/static/uploads/BorisTux_w_Logo.png‘
bone$ sudo fbi -d /dev/fb1 -T 1 -a BorisTux_w_Logo.png
Comments are not currently available for this post.